How to Turn Windows Defender On or Off in Windows 10
The process of turning Windows Defender on or off in Windows 10 is simpler as compared to the one used in Windows 8.
In Windows 8 you could disable Windows Defender from within the program itself but to enable it you were required to go to the Action Center. On the other hand in Windows 10 you can enable or disable Windows Defender from a common window and accessing the window is easy as well. The only requirement to complete the task is that you must log on or sign-in to Windows 10 using any account that has admin rights on the computer.
To enable or disable Windows Defender in Windows 10 you must follow the steps given below:
Disabling Windows Defender
- Sign-in or log on to your Windows 10 PC using any account holding administrator privileges.
- Once on the desktop window click the Start button.
- From the left pane of the opened Start menu click Settings.
- From the SETTINGS window click Update & security.
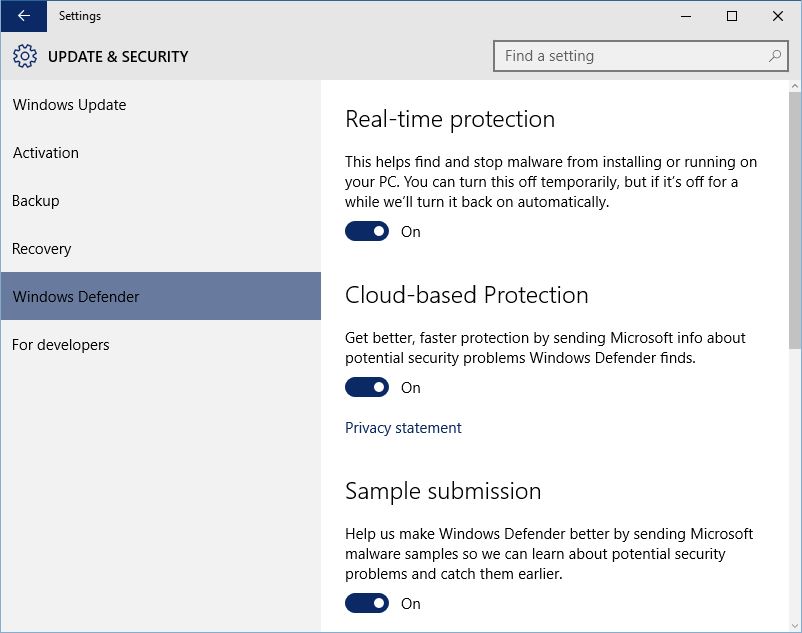
- When on the UPDATE & SECURITY window from the left pane click to select the Windows Defender category.
- From the right pane switch the buttons under the Real-time protection Cloud-based Protection and Sample submission sections to Off.
- Close the UPDATE & SECURITY window when done.
Enabling Windows Defender
- Follow the instructions from 1 to 5 given in the Disabling Windows Defender section above.
- From the right pane switch the buttons under the Real-time protection Cloud-based Protection and Sample submission sections to On.
- Close the UPDATE & SECURITY window when done.


