How to Troubleshoot Internet Connectivity in Windows 10
While using Windows 10 there may be times when the computer fails to connect to the Internet. This may be due to various reasons such as:
- There is some fault at the ISP’s end.
- The router is faulty.
- The cable is broken.
- There is some disturbance in the wireless signal.
However most of the times the issue is some misconfiguration in Windows settings itself. Some examples can be:
- The static or dynamic IP address is configured which may not be compliant with the configuration of the router or Internet Service Provider (ISP).
- The NIC responsible for the Internet connection is set to turn off automatically. (Default configuration)
To resolve the above two issues from within the operating system itself you must follow the steps given in either of the sections described below:
If There Is No Internet Access
In case there is no Internet access on your computer even if you are sure that the router is configured correctly there is no problem from the ISP’s end and the cable is not faulty as well you can try the following:
- Log on to Windows 10 using an administrator account.
- On the desktop screen press the Windows + R keys on the keyboard together.
- In the available field in the Run command box type NCPA.CPL and press Enter.
- From the opened Network Connections window right-click the network interface card (NIC) that should provide the Internet access.
- From the displayed context menu click Diagnose and follow the on-screen instructions to rectify the issue.
- If the problem persists right-click the NIC again.
- From the context menu click Properties this time.
- From the opened NIC’s properties box from the displayed list click to select Internet Protocol Version 4 (TCP/IPv4).
- Click the Properties button.
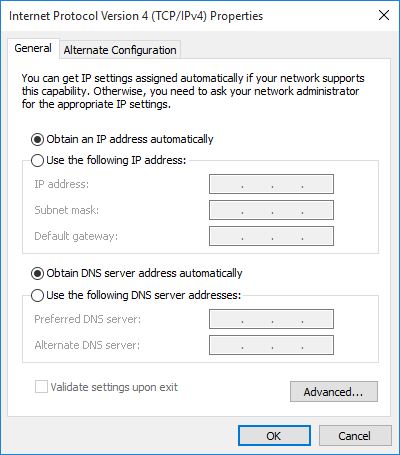
- From the Internet Protocol Version 4 (TCP/IPv4) Properties box click to select the Use the following IP address radio button.
- Verify that the Use the following DNS server addresses radio button is automatically selected.
- Populate the IP address Subnet mask Default gateway Preferred DNS server and Alternate DNS server fields with the correct values.
Note: If you are unsure what values should be entered in the fields it would be a good idea to contact your ISP or in case of home router refer to the router’s user manual or contact the router’s vendor’s customer support team.
Note: If all the fields are already populated with the values you can try configuring Windows 10 to get the IP address and all other settings automatically from the router or the ISP. You can do so by selecting the Obtain an IP address automatically and Obtain DNS server address automatically radio buttons in the Internet Protocol Version 4 (TCP/IPv4) Properties box.
- Once the fields are populated with the values (or Windows is configured to get the settings automatically) click OK and back on the NIC’s properties box click OK again.
- Windows 10 should be able to connect to the Internet.
If Windows 10 Has No Valid IP Configuration
If you are displayed with an error message saying that Windows does not have a valid IP address configuration the chances are that the NIC is set to go to sleep automatically (default configuration). Disabling the option resolves the issue many times. You can try the following to do so:
- Log on to Windows 10 with an administrator account.
- From the desktop screen right-click the Start button.
- From the context menu click Computer Management.
- From the left pane of the opened Computer Management snap-in click to select Device Manager.
- From the right pane expand the Network adapters tree.
- From the list of available network adapters right-click the one that should provide the Internet connection.
- From the context menu click Properties.
- Once the properties box of the network adapter opens up go to the Power Management tab.
- From the displayed options uncheck the Allow the computer to turn off this device to save power checkbox.
- Click OK when done and close the Computer Management snap-in.
- Restart the computer and connect it to the Internet.


