How to Enable or Disable User Account Control in Windows 10
As it is with Windows Vista and greater operating systems Windows 10 also has User Account Control in it and is by default enabled.
With User Account Control enabled in the operating system the risks of OS getting infected with the viruses malicious scripts and other harmful threats are remarkably reduced. Since the User Account Control prompts you for your consent before installing anything or copying any file to the system drive (C:) or any of its protected folder you have full control when it comes to choosing what should be installed and which objects should be prohibited from entering in the computer.
Although it is highly recommended that you keep the User Account Control enabled for some testing purposes you may want to disable the UAC temporarily from your Windows 10 PC. In such situations you can follow the steps given below to get the task done:
WARNING!!
Disabling the User Account Control from Windows 10 computer may make it vulnerable to risks. Make sure that you re-enable UAC after you have completed your testing phase.
- Sign-in to your Windows 10 computer with a Microsoft account or any local account that has administrator privileges.
- In the search box available in the taskbar type User Account Control.
- From the displayed list of suggestions click Change User Account Control Settings.
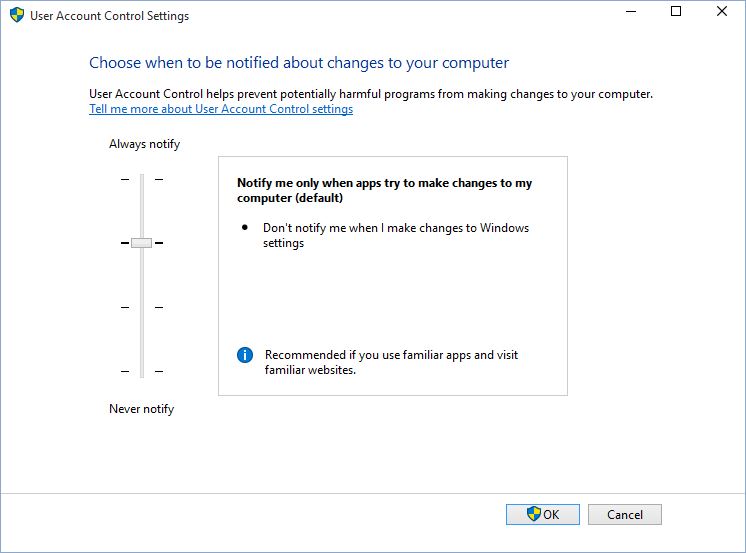
- From the User Account Control Settings box move the slider down to Never notify option at the bottom.
- Once done click OK and when/if prompted for click Yes in the User Account Control confirmation box that is displayed.
- In order to re-enable the User Account Control (UAC) follow the above steps from 1 to 5 while moving the slider back to its default pointer (or any other marked point as needed) when on step 4.
Note: You may need to restart your PC after changing the UAC settings in order to allow the changes to take effect.


